Monday, December 30, 2013

Quick New Years Stir-fry

Been a busy holiday around here. But never fear. I have something super tasty, beautifully colored, healthy and, most importantly, easy for you to whip up during a busy time.


[What you need]
Olive oil
3 cloves garlic
1 head bok choy
1 head cauliflower (We used purple cauliflower, but any color will do. You have to admit the purple give it a certain something though)
~ 12 oz of shitake mushrooms

[What to do]

  1. Press the garlic and let it sit a few moments as the oil heats up then add it to the pan.
  2. Chop the bok choy, adding the stalks to the pan first (they take longer to cook) then the leaves
  3. Chop and add cauliflower and mushrooms
  4. Cover and simmer for about 5-8 minutes
See? Easy! Perfect for the night when you're tired of cooking elaborate holiday meals

Monday, December 16, 2013

Torrone

Picture, if you will, your favorite childhood candy. Maybe, like my madre, your mind goes to miniature Tootsie Rolls or, like my sister, you're thinking of the ever allusive Zero bar. For me, there are two candies which make my mouth water with nostalgic joy. One is dark chocolate. One is nougat. Both involve almonds. I really don't know if I can stress enough how much I love almonds.


One of these can be found in just about any corner of the world. The other...I have only ever seen in grocery stores that specifically market themselves as "Italian". Because of the lack of such stores in the little nook of the world I find myself in, I've decided to whip up a batch on my own for the holidays.


It turned out to be a lot harder than I thought it would be.


The recipes I found were simple enough. The problem was: it takes a long time and a lot of patience, two things I never really seem to have in spades. If I had to watch a bunch of thermometers and jump back and forth between pots like my other candy making adventures require, I actually might have found this easier. In reality, making Torrone is a highly meditative chemistry lesson ideal for the day I had this Saturday when we snowed in anyway.


Torrone
Adapted from Dellalo and Food52

[What you need]
12 oz of honey (about 1 1/2 cups)
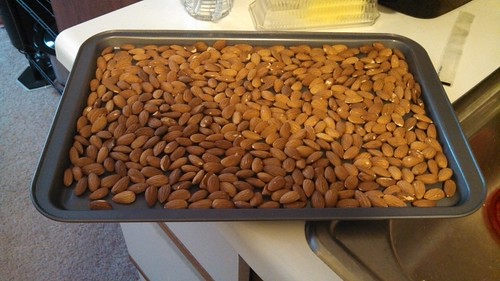
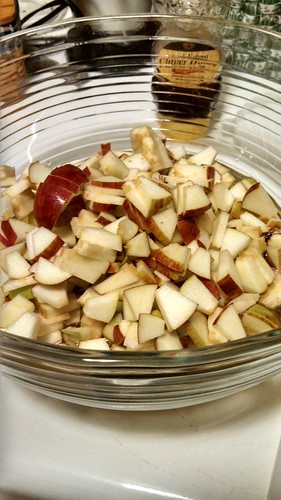
4 cups of whole almonds
3 egg whites
flavoring to taste (a box of Torrone from the store will come with vanilla, lemon, and orange. Lemon is my favorite so I used it exclusively, but feel free to get creative.)
1 1/4 cup powdered suger (optional: for the impatient among us.)
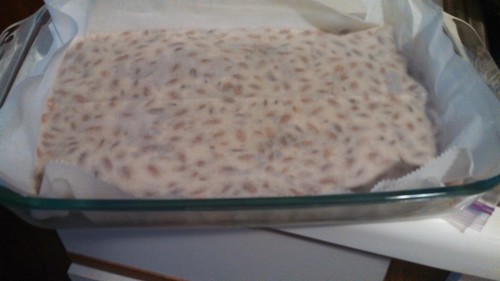
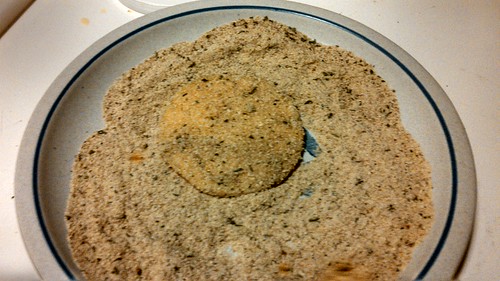
2 sheets ostia wafer paper (which can be found here - honestly, I just used rice paper for my first batch. I mainly include the more traditional detail for the fun story my madre tells in which she and her sisters used to peel the paper off the nougats and "play communion" when they were young.)

[What to do]
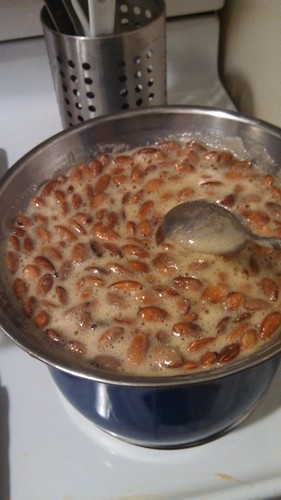
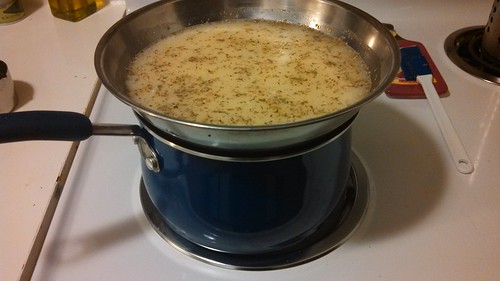
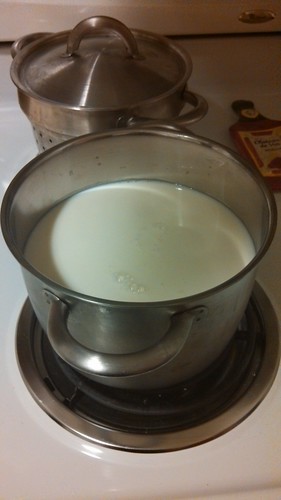
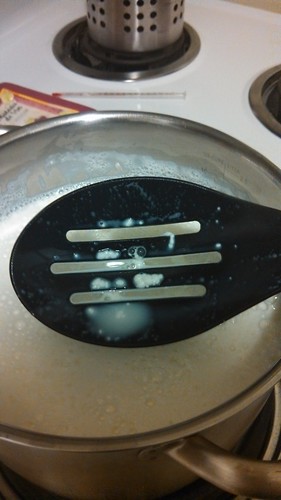
1.Set up a double boiler system and pour in the honey. Cook until it is clearly of a liquid consistency, stirring frequently. This took me around an 1 1/2 hours.
2. In the meantime, roast the almonds. Put them on a rimmed baking sheet in the oven (at around 350 degrees F.)  for 10-15 minutes.
3. Beat the egg whites until stiff peaks form. This step is crucial, do not rush it. The eggs are the binder that bring the whole thing together.
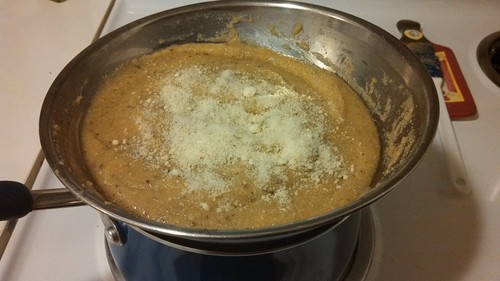
4. Fold the egg whites into the honey. Continue folding until the mixture becomes thick and somewhat caramel-like. This step, also crucial, takes a long time. I, personally, almost gave up on it, thinking that it would never set. Don't panic. Just stir. (If you find that you can't deal with this any longer, add the powdered sugar. It will help thicken things up; however, the candy will no longer be authentic.)
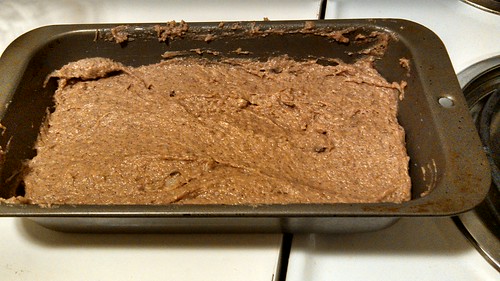
5. Fold in the almonds and flavoring. The mixture should be thick enough that the almonds don't all sink immediately.
6. Line a baking dish with wafer paper and pour the mixture in. Place another wafer paper on top and press down with your hands or other weight. Set aside for at least an hour while it firms up; it may take longer.
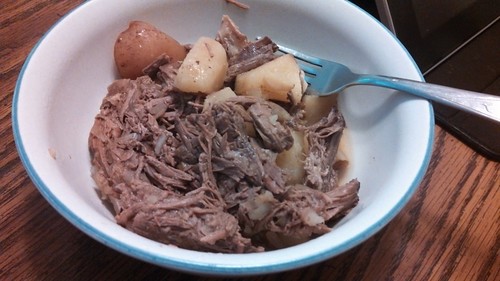
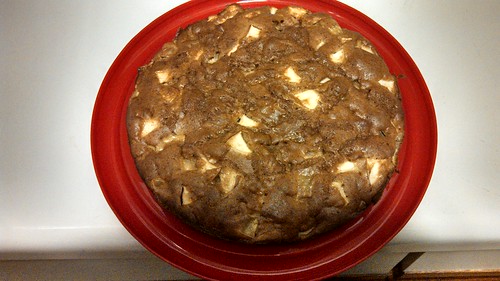
7. To serve, flip it over and cut the nougat into squares.

Wednesday, December 11, 2013

Comfort Food: Slow Cooker Beef Roast

I offer my apologies for the missed post last week and the lateness of this post. You see, I've been doing a lot of cooking lately, but I have forgotten to take pictures. That means we've missed out on some great stuff, but never fear. I will make them a second time, just for all of your benefit. Especially now that I've learned, thanks to Thanksgiving, that people are actually reading this. [I'm still trying to figure out the comments section. I'll let you know when I have that sorted out.]

So without further adieu, a childhood favorite and a good meal for very lazy days: The Slow Cook Beef Roast.

The best thing about this meal is not even the ease of it. It's the smell. Coming home to the smell of this delightful meal simmering away is heavenly. Even more so on freezing winter days like the past few have been.

All it takes is a few vegetables, beef stock, and a beef roast (Just about any cut will do. It will be cooking so long that it will be plenty tender. I assure you.)


Slow Cooker Beef Roast
via (to the best of my knowledge) mi madre

[What you need]
Cut of Beef
Salt
Pepper
Carrots
Potatoes
Onions
Beef Stock or Broth (enough to pretty much cover the roast)
A slow cooker

[What to do]
1. Season the Beef with salt and pepper then add to slow cooker
2. Chop up the various vegetables and add them around the roast.
3. Cover this in stock/broth
4. Cook on low for about 8 hours
5. (and don't forget this step, it's crucial) At some point in that 8 hour period, leave and then come home so you can enjoy that smell.

See? Wasn't that easy?

Monday, November 25, 2013

Polenta

You're about to walk into some contentious territory, so I suggest you prepare yourself.


Polenta is one of those foods that can be found pretty much anywhere (I mean, it's essentially cornmeal mush), but what you put on it drastically varies by region. Fry it and cover it with milk based beef gravy and you've done it Pennsylvania Dutch style. A tomato sauce? Northern Italian territory.

I know, I betraying my Sicilian roots here, but Polenta is tasty and I think it's status as a "peasant food" to the point where I know people ashamed to make it make it a little less of a betrayal.


There are Polenta stories in my family, though most of them involve my mother carefully explaining to me that my bisnonna would probably have never made polenta

All of this aside, I really enjoy the dish. It is a hearty and warm meal that reheats well and is a perfect dish to make large quantities of on cold night as we approach winter.


Polenta
[adapted from Food52]

[what you need]
4 cups ricotta whey (you can get the whey by making this recipe)
1 cup ground cornmeal
1 teaspoon of salt
2 tablespoons oregano
1 tablespoon parsley
1 tablespoon basil
2 tablespoons parmesan cheese

[what to do]
1. Set up a double boiler. (several cups of water in one pan with another pan or bowl overtop)
2. Put whey, cornmeal and seasonings in the top of the double boiler. Stir carefully.
3. Cook until polenta is thick. This should take between 30-45 minutes.
4. Stir in cheese
5. Either top with gravy/tomato sauce and serve or separate into containers for storage and top with choice toppings later. I like to make large batches ahead of time for hearty lunches.

Monday, November 18, 2013

Ricotta Cheese

Ask my madre what my feelings are regarding ricotta cheese and she will probably recall my description of said cheese as "a little piece of heaven." It is, honestly, my favorite cheese of all, and with as much as I love cheese, that's a high honor.

Cheesemaking is a project I have wanted to undergo for some time, but I've been far too nervous. It seemed like quite the undertaking and I just wasn't sure of where to begin. With some help from cheesemaking.com though, I was well on my way.

Cheese is in my blood. On my father's side of the family, there's a whole branch of cheesemonger types, but because it's my favorite (and honestly, probably the easiest), I went a little more toward madre's Italian side for my first foray into the world of cheese*.

To create a "little piece of heaven" you start with whole milk (making certain it is not ultra pasteurized) in a stainless steel pot. For this recipe, I used a 1/2 gallon.


Stirring frequently, add 1/2 tsp of citric acid and 1/2 tsp of Kosher salt. Then heat the milk to 195 degrees F. Soon you will start to see the curds forming, which (at least to me) is very exciting.


After the curds and whey begin to separate and the milk reaches 195 degrees F, let it sit for at least five minutes. While that's happening, you can prepare fore the next step.


Line a colander with a thin-weave cheesecloth (muslin works well) and ladle the curds into it. Finally let the ricotta drip through for about 30 minutes. I got a little impatient and tried to squeeze mine out. Don't do this. The whey is very hot.


Once separated you will have delicious ricotta cheese and a whole bunch of protein whey, which is not just a by-product; it's totally useful. I made some pizza dough with mine, but the possibilities are endless.


*Well, to be perfectly honest, I was going to start with mozzarella, but I ran into several problems. The largest of which being the only stainless steel pot in my possession was only capable of holding a half gallon, meaning I had to halve the recipe and no one wants to try and cut a rennet tablet into eighths. No one.

Monday, November 11, 2013

Cabbage Soup

I'll chalk the invention of this soup up to Nonno. He's the one who deciphered the ingredients, at least. This fact partially explains how this recipe got passed down to me the way it did: as a list of ingredients and nothing more.

This is not an uncommon problem with the recipes I've acquired from my family. Plenty of recipes in The Cookbook have an annotation that essentially tells you to call someone else who might have an idea of the baking temperature or how to combine things, etc. Unfortunately, many of the people referred are also no longer with us.

Luckily in this case, I still had people around who could make heads or tails of things.

We start with a simple head of cabbage and shred it.


Then add the rest of the ingredients to the pot. Seriously. That's all you need to do. Well, that and simmer for about 4 hours until the cabbage cooks down.


Cabbage Soup

[Ingredients]
1 head cabbage
onions, chopped
meatballs
tomato sauce
1 cube beef bouillon (or one cup beef stock)
salt
pepper
oregano
rosemary
basil


Monday, November 4, 2013

Prozia Celi's Chocolate Chip Cookies [The Cookbook]

For many a year, I have been on a mission to find the perfect chocolate chip cookie recipe and for many a year, I have failed miserably. My mother's suggestion to "Just use the recipe on the back of the chocolate chip bag" only yielded cookies so flat that they might have been good substitutes for hamster frisbees.

I've heard countless suggestions:

  • Use bread flour
  • Use double the amount of flour
  • Use only brown sugar
  • Use only cane sugar
  • Stir the dough as little as possible
  • Use applesauce
The list goes on and on. I still have yet to produce chocolate chips that rival the Toll House ready-bake ones (and I am -seriously- ashamed of this) or my mother's, both of which taste chewy and lovely like they were made by an actually competent baker.

So, of course, when I discovered a chocolate chip recipe in The Cookbook, I simply had to try it. If anyone could solve my chocolate chip cookie dilemma, it had to be Bisnonna.


In some ways she did. These cookies definitely did not turn out flat. They were nice puffy little balls of tasty. They are a little denser and more cake-like that other chocolate chip cookies that I have made in the past, however. I am definitely going to keep this recipe in my arsenal, but the search goes on.

Chocolate Chip Cookies
via The Cookbook (attributed to Prozia Celi)

1 c. crisco, 3/4 c. brown sugar, 3/4 c. white sugar, 1t vanilla, 2 eggs, 3 c. flour, 1 t baking soda, 1/2 t salt, 1 6oz package chocolate chips, 1 c. nuts
Bake 350 degrees for 8-10 minutes

Madre adds: If you want the other recipe for the chocolate chip cookies that Grandma made, look on a bag of chocolate chips. When she didn't use this recipe, she used the original Toll House recipe. 

[Apparently I'm just incapable of recreating the bag of chips recipe.]

Sunday, October 27, 2013

Potato Soup aka The Cure for the Common Cold [The Cookbook]

[Apologies for the lack of pictures. Blame the congestion brain.]

It's been a rough week. First full week back in the office after a few off and of course I come down with a nasty cold. Not able to stay home, I had to turn to more unorthodox methods to manage the symptoms. Number one of which is my Bisnonna's potato soup. This soup never fails me.

It's pretty basic: just potatoes, chicken broth, onions, carrots, and some seasonings.

The key to this soup, unlike the usual potato soups, is the lack of milk (dairy is awful when you have a cold). The potatoes are cooked until they break down somewhat which adds a level of thick creaminess to the broth.

I also recommend adding garlic and cayenne pepper to the broth (sorry, Bisnonna, but they help clear my sinuses).

Potato Soup
[via The Cookbook]

Bisnonna writes: Brown an onion. Add some water with chicken base (creating a broth), chop up a few carrots, cube some potatoes, add to the broth and let cook for a good while so that the potatoes start to break up a little and the broth thickens. The amounts depend upon how much you want to make. Use your own judgement.

Madre adds: Grandma used to laugh and say that she could tell if an American made the soup; they always add milk to it.

Bonus!
Prozia Lena's Sore Throat Cure

shot whiskey + black tea + honey


Monday, October 21, 2013

Apple and Corn Datch

This week we're going to explore a different side of my heritage.

I grew up in Eastern Ohio, the land of the Pennsylvania Dutch. One of my favorite childhood treats (which I have definitely brought into adulthood) revolved around a trip out to a restaurant called Dutch Valley for the breakfast buffet. The memory of this recipe originates there.

"I should make apple fritters," I thought looking over the still massive number of apples left from apple picking.

"Anything like corn fritters?" My boyfriend asked, offering to make corn fritters.

I hadn't made either before. But somewhere in the back of my mind I remembered a combination pancake of apple and corn from days long gone by. I decided to begin the search.

The internet brought up a few apple fritters and corn fritters, but few apple & corn fritters in combination. Still, I refused to give up. Soon I came across a dish referred to as "datch" and began to wonder, could this be the long lost apple/corn pancake from the breakfast buffets of my youth? The recipes still mainly included apples or corn, but by this time I had decided to throw them together and see what stuck.

What resulted was an intriguing combination of savory and sweet that is heavenly with a little bit of butter. I'm not sure if it really counts as datch or it's the same foodstuff I remembered, but below is my attempt to recreate it.


Amy's Apple & Corn Datch
inspired by Pennsylvania Cooking and Goodreads user Valerie with adaptations by me

[ingredients]
2 apples, diced
3 ears of sweet corn
1 egg
2/3 cup flour
1 teaspoon salt
oil for frying

[What to do]
  1. Dice apples and cut the kernels off the ears of corn
  2. Beat together egg, flour, and salt. Then slowly stir in apples and corn. The batter will be thin. Resist the urge to add flour. [I kept trying to, but my boyfriend stopped me saying that corn fritter batter is supposed to be thin...but he's the pancake chef after all. He would know.]
  3. Fry much as you would a pancake: add a spoonful to the pan, flip when edges start to bubble.
  4. Serve with butter and salt (to taste)


Monday, October 14, 2013

Comfort Food: Fried Squash

Apples and pumpkins aren't the only perfect fall ingredients. There's another beautiful vegetable that has been popular lately and is my own personal favorite food of fall: butternut squash.


There are many ways to prepare butternut squash. Countless recipes abound. A personal favorite of mine is probably the least healthy, not going to lie, but that's way we call it comfort food, right?

One fall weekend afternoon, a few years back, my mother and aunt brought by a squash and started a tradition. We fried up the squash together and probably ate it all before it got anywhere near the table. It became something we did together and now whenever I make this dish, I think of my mother and aunt and I standing around the stove in the kitchen, sneaking way too hot discs of squash directly from the pan.


Fried Butternut Squash
As far as I know: via Madre and Zia Leslie

[Ingredients] - Amounts vary depending on desired yield
Butternut Squash
Italian Breadcrumbs
Eggs
Milk
Olive oil

[What to do]
  1. Peel squash and cut into discs (the thinner the better)
  2. Mix egg and milk into a bowl (you need less than you think)
  3. Dip each disc into milk/egg mixture and then into breadcrumbs (Bisnonna would say that you have to use separate hands for this task. getting milk/egg into the breadcrumbs or vis-versa is a huge no-no).
  4. Fry discs in a flat pan with about a 1/2 inch of olive oil.


Monday, October 7, 2013

Nonna's Applesauce Nutbread [The Cookbook]

Since the apple picking adventure, apple dishes have been unusually abundant in our kitchen. This recipe in particular intrigued me though I do not recall any one ever making it before.


According to The Cookbook, this was my grandmother's recipe and since I had plenty of freshly made apple sauce and apple butter around, I was intrigued to give something new a try.

It was pretty new. I've had apple cakes before and banana and/or zucchini breads, but never apple bread.


It turned out to be just as tasty as my madre claimed in The Cookbook, so I say "Go for it!" too.


Applesauce Nutbread
Via The Cookbook

2 c. flour, 3/4 c. sugar, 3 t. baking powder, 1 t. salt, 1/2 t. soda, 1/2 t. cinnamon, 1 c. coarse chopped nuts, 1 well beaten eggs, 1 c. medium thick unsweetened applesauce, 2 T. melted shortening

Mix sifted dry ingredients and nuts together. Combine egg, applesauce and shortening. Add to dry ingredients and stir until blended. Pour into a greased loaf pan. Bake in a 350 iver for 50 mins.

Madre adds: Grandma and mom made this recipe a lot. It was great warm out of the oven with a little bit of butter on. Go for it!

Monday, September 30, 2013

Slow Cooker Apple Butter-Sauce!

Last weekend we decided to go on an adventure:

Imgage: apples in a tree


apple picking!

It's early autumn and after a dismal crop last year, things in the area are looking up. Judging by the fact that we ended up with a full half-bushel of Macintosh apples in record time, I'd say it was a good year.

The only question was what to do with so many apples?

I scoured The Cookbook seeking apple recipes and found several, which will likely be featured over the next few weeks, but there were also a few that called for the apples to be in a little more cooked down state (apple butter or apple sauce). My mind immediately concocted a brilliant plan: instead of buying apple butter/sauce, why not make my own? Surely, I had enough apples on hand...Couldn't be too labor intensive, right?

Right on both counts!

I found the idea for making apple butter in the slow cooker on Pinterest, which was plenty exciting. Then I ran with it, creating a recipe to suit my own needs.


The hardest part for me was peeling the apples. There are amazing people on this earth who can peel an apple in one continuous loop. I am definitely not one of those people. Eventually I got all 15 apples peeled and it was easy going from there on out.


Slow Cooker Apple Butter/Sauce
Inspired by GuruToTheOutdoors  with heavy adaptations by my crazy brain

[ingredients]
15 apples (or however many you need - 15 is what filled my crockpot)
1/2 cup cane sugar
1/2 cup packed dark brown sugar
1/2 teaspoon ginger
3 tablespoons cinnamon
3 tablespoons lemon juice

[What to do]
  1. Peel and core apples. Cut into cubes and add them to the crockpot.
  2. Add lemon juice, stir. Then add dry ingredients, stir again.
  3. Cook on low for 6 hours. Mash up with a spoon. - At this point it is thicker and more applesauce-like.
  4. Continue cooking for another 2 hours. -Now we have apple butter!
  5. If you like chunkier apple butter, leave as is. If you prefer a smooth consistency, blend the butter before canning.
My mixture made about 2 small and 1 regular sized jar as well as about 2 cups left over, which I intended for immediate use.


Monday, September 23, 2013

Stuffed Pepper Soup

It’s getting cold. Can you feel it? Soon it will be Autumn and my favorite time of year: Soup season!


I could wax rhapsodic about my love for soup for many an age. I love soup of all kinds (so long as the amount of celery that ends up floating in the stock is limited -- but that’s an argument for another day). The one I'm about to present to you is one of my all time favorites.


I have a special relationship with stuffed pepper soup (and definitely more memories surrounding this little number than actual stuffed peppers). Many a chilly fall / winter day has been warmed by this soup, but there is one fall day in particular:

It was my junior year of college and having lived in a dorm on a meal plan for the past two years, my cooking skills left something to be desired. Not to mention the fact that college was a rough one emotionally. So, one fall day when things had been particularly rough (though this was still before the time of the bats), my mother showed up with several bags full of ingredients and we got down to making stuffed pepper soup.


Since then, stuffed pepper soup has been on of "our things". Whenever I come home during the fall or winter holidays, we tend to make it at least once. Just last week, she came up to attend a Michigan football game and we made yet another batch.

[ignore the beans; we also made chili]

And so, since this is one of my most requested recipes (especially by my dear friend Jill), I've decided to share its wonderment with you.

Stuffed Pepper Soup
[via mi madre]

[Ingredients]
2 lb ground beef
1 green bell pepper
1 can tomato sauce
1 diced tomato
2 cubes beef bouillon
1/4 cup brown sugar
2 tsp salt
1 tsp black pepper
1 T soy sauce
2 cups cooked rice

[What to do]
  1. Brown beef over medium heat
  2. Add peppers and saute for 3 minutes
  3. Stir in rest of ingredients (sans rice). Reduce heat to love, cover and simmer for 30-45 minutes
  4. Stir in rice and heat through
  5. Be sure to add some Parmesan  and romano cheese to the top when you serve.

Monday, September 16, 2013

Comfort Food: Zucchini and Tomato Sauce

This is one of those passed down recipes with no explicit instructions.

One of those things that you've been making so long, you could make it in your sleep.

Comfort food.


Everyone has a comfort food or two, whether it be macaroni and cheese or chocolate chip cookie dough ice cream. I have...potentially too may comfort foods. Each of them occupy different roles and fulfill different purposes. Different foods to comfort different ailments. Ravioli soothes the savage "missing my family." Potato soup cures illness. Banana pepper and mushroom pizza is good for dealing with rejection letters. But then there's zucchini and tomato sauce - something so utterly simple that only it could be the cure for "I have run out of energy and could sleep solidly for a week."

I'm sure I'm not the only one who has those sorts of days.


Part of the reason it's such a good dish for times like this is it's easy of preparation, limited required commitment, and relative abundance of the necessary ingredients (especially around this time of year).

In order to produce a quality dish of zucchini and tomato sauce, all one must do is slice up a few of the zucchini squash, add it to a pot and douse it with tomato sauce of your choosing. When the zucchini is pretty much cooked down, add some grated Parmesan cheese and stir well.

This was a common side dish growing up in my family, but I'm not ashamed of the number of times it has shown up as a main dish on my own table. Some days, comfort food is exactly what you need.


Monday, September 9, 2013

Prozia's Apple Cake [The Cookbook]

Ideally, I would have posted this last week, but I didn't get around to baking until Wednesday night. 


A few days ago, I noticed one of the trees outside my apartment had developed red leaves signifying the start of fall. Early fall is full of beautiful things, but one of my favorites is fresh apples. What better time to highlight some of the exciting apple recipes in The Cookbook

Since I had fresh apples, I decided to begin with an apple cake recipe, which according to The Cookbook was given to Bisnonna by her sister Celi. My Prozias (great-aunts) will likely appear a lot of this blog as I have many memories attached to their cooking as well. While I don't remember this particular cake, I can tell you that I am -glad- that I made it.

I made a slight modification to this recipe as well. The original calls for 1 3/4 cups of sugar. I substituted 1 cup of sugar and 3/4 cup honey. There's no real explanation for this choice beyond the spirit of experimentation. I also left out the powdered sugar and whipped cream, using it as more of a breakfast cake, but I imagine that it would be scrumptious as a dessert as well.


Apple Cake
Via The Cookbook


3 eggs, 1 3/4 c. sugar, 1 c. oil, 2 c. flour, 1 t. baking soda, 1 t. cinnamon, pinch salt, 4-6 diced apples, 1/2 c. nuts
Bake for 1hr. at 350 degrees or 325 if using a glass pan. Sprinkle with powder sugar, can be served with whipped cream. 

Monday, September 2, 2013

Baked Whitefish with Tomatoes

I was struck by the lack of fish in The Cookbook. I've been taught that fish is pretty much a staple of Southern Italian cooking, but there wasn't a single recipe that involved fish within the collection my mother had gathered.

I think it has something to do with Madre not being a big fish fan as well as the expense of fish in general. An interesting aspect of Bisnonna's cooking is how influenced it was by the Great Depression. Lots of the recipes she used sub out the traditional meats or other items for those that could be obtained more cheaply.

So, there were no fish recipes, but I wasn't about to let that stop me. Beside, I ended up with a lot more fish from the farmer's market than I actually meant to buy...[Farmer's Markets make me nervous, what can I say?] So I concocted something of my own based on what I had around and some guidance from Giada DeLaurentis and the BBC.

I do love fish. And in the Great Lakes, whitefish is -the- fish. Whitefish, of course, refers to a variety of fish so far as fisheries are concerned, but the fishery we go to uses the term to refer to Lake Whitefish. As always, when choosing fish, remember to shop sustainably.


Baked Whitefish With Tomatoes
Adapted from Giada De Laurentiis and BBC's Good Foods Magazine

[ingredients - serves 4]
2 Whitefish fillets (or other sustainable fish for your region)
1/3 cup Olive Oil
1/3 cup lemon juice
3 large tomatoes
Basil, Parsley, Black Pepper to taste

[What to do]

  1. Pre-heat oven to 350 degrees F
  2. Drizzle some of the olive oil in the bottom of a glass baking pan.
  3. Season the fillets and add them to the pan. Cover in rest of oil, lemon juice and tomatoes cut into smaller pieces.
  4. Cover baking pan (I used tin foil) and bake for 25-30 minutes
I served this fish with some brown rice sprinkled with Parmesan cheese.


Monday, August 26, 2013

Bisnonna's Stuffed Green Peppers [The Cookbook]

My own memories of the illustrious stuffed pepper are fuzzy at best. I remember my mother making them and I remember them being wrapped, trayed, and put into the freezer. I think they were a cookout, party, or large gathering food of some kind because I recall nothing about them making an appearance at our dinner table. Honestly, I’m not sure if that makes this a great place to start or an awful one. Nevertheless...


It all starts with the bell pepper (also referred to as peperoni in Italian and mango in certain parts of rural Ohio), the least spicy variety of Capsicum annuum. Don’t get me wrong, I love my spicy chiles, but there is something subtle and lovely about a simple green pepper. Then there’s the way they smell...

It’s one of my favorite smells: a fresh bell pepper. When we would go to the farm market or some other produce stand, my father would always smell the bell peppers. That’s how he would choose which ones were right for our purposes. I don’t know if my mother believes him, but I do. Bell peppers smell crisp with a light bitterness that just makes me happy for some reason. Maybe that’s why I like Cabernet Sauvignon.


Despite prepping for a lengthy endeavor, my Bisnonna's Stuffed Peppers turned out to be much simpler than anticipated. I modified her recipe a little: a sin, I know, but I suspected this will happen a lot as many of the recipes do not include exact amounts or really any instructions at all. My modifications here are mainly an issue of experimentation.

And of course there's that rebellious streak. Bisnonna's first instruction is to cut the peppers in half and clean them out. I also remember my mother cutting them in half so that they looked like little boats. I instead cut the tops off because I am not very good at following instructions.


The experimentation carried over into the rice (brown and made in a rice cooker) and to the stuffing mix, to which I added bread crumbs, basil, and red pepper flakes.

The one rule I did not dare to flaut, however, was topping with a little more sauce and some Romano cheese. Madre told me this was incredibly important and I agree.


Stuffed Green Peppers 
Via The Cookbook


Bisnonna writes: 
Cut in half and clean out your green peppers, set them aside. Make your rice according to the box's directions. Brown an onion and a little bit of garlic in some oil, add some ground beef and simmer. Mix this with the rice and add a little bit of sauce. Put this into your green peppers, top with some more sauce and a little bit of Romano cheese. Put them on cookie sheets and bake in a 350 degrees over for about 45 mins. or until tender.

Madre adds:
Remember when you eat these, EAT THE PEPPERS TOO. Grandma used to yell at us kids because we'd eat only the stuffing. One time she had left over stuffing and she told us to eat that. Well, it didn't taste the same.
[I'm not sure what she was on about honestly. It makes a pretty good tortilla dip.] 


Saturday, August 17, 2013

If I had to describe the way my family expresses emotion (every emotion from despair to joy to jealousy), I could do it in one word: food. Celebration was food...and grief was food.

I was nine years old when my mother put together “The Cookbook”. After the death of my great-grandmother, my mother channeled her grief into cobbling together a collection of her recipes and spreading it out among the relatives. She took the pain she felt at losing someone she desperately loved and turned it into a remembrance: a way to keep, at least one aspect of her alive. This is where our story begins: with me, who has been cooking like a college student (ramen noodles for a week straight is healthy, right?) for -far- too long, who once-upon-a-time really was a decent cook, who feels a little disoriented about her place in the world, and a set of recipes: “The Cookbook” as well as many others. Recipes and family stories in hand, we’re going on a culinary expedition! I hope you’re hungry.